Designing Forms in Visual Builder Cloud Service
In this post I will give you an overview of how to design a form in VBCS and make use of the available REST services in Fusion ERP Cloud to view the data.
VBCS can only work with REST services as of now but we can leverage Integration cloud to convert web services into REST services and make them available to VBCS.
The example provided below designs a simple form with a table and connect to ERP Cloud to get the inventory item details.
Create a new application and add the relevant details and click on Finish.
Now click on Service Connections and add the relevant details.
Create a new Service Connection and select the source as Define by Specification
Enter the relevant details and click on next
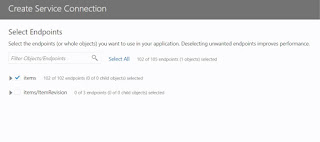
select the items end point and click on create
Now navigate to Web Applications and create a new Web Application as shown below.
Design the form and add the table component to the form as shown below.
Click on the Add Data property to map the underlying source data for the table. Select the item end point and click on next.
Select the columns which are to be displayed on the form.
Click on Next and associate any query parameters if required. In this example we don't have any query parameters to add so click on Finish.
We can now view the data in the Design View as shown below.
We can also change the column name by editing the headerText tag as shown below.
Click on Run icon to run the application.
The form would be displayed in a new window.
In this post I will give you an overview of how to design a form in VBCS and make use of the available REST services in Fusion ERP Cloud to view the data.
VBCS can only work with REST services as of now but we can leverage Integration cloud to convert web services into REST services and make them available to VBCS.
The example provided below designs a simple form with a table and connect to ERP Cloud to get the inventory item details.
Create a new application and add the relevant details and click on Finish.
Now click on Service Connections and add the relevant details.
Create a new Service Connection and select the source as Define by Specification
Enter the relevant details and click on next
select the items end point and click on create
Now navigate to Web Applications and create a new Web Application as shown below.
Design the form and add the table component to the form as shown below.
Click on the Add Data property to map the underlying source data for the table. Select the item end point and click on next.
Select the columns which are to be displayed on the form.
We can now view the data in the Design View as shown below.
We can also change the column name by editing the headerText tag as shown below.
Click on Run icon to run the application.
The form would be displayed in a new window.


